Easy Carmen Sprung Origami Flower: Step-by-Step
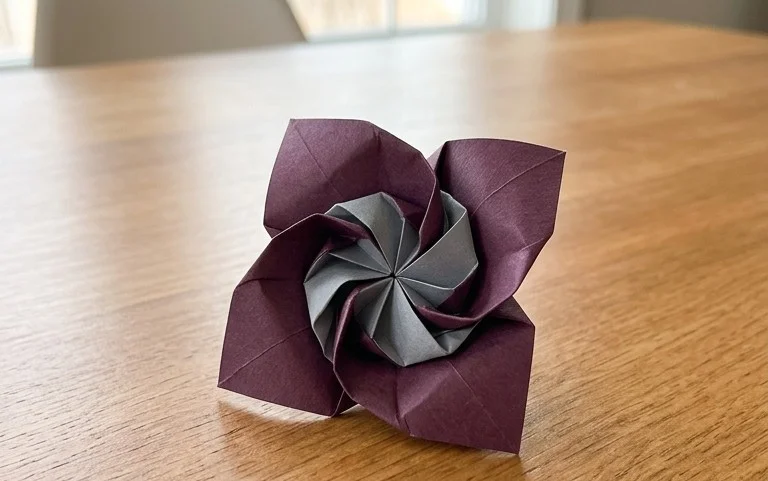
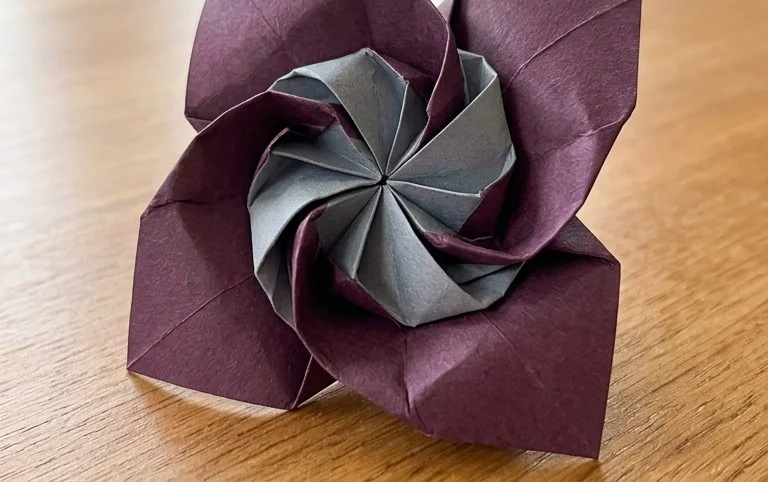
Carmen Sprung origami flower folding is a delightful way to create a beautiful, multi-layered bloom that looks stunning from every angle. Imagine a flower with intricately folded petals that curve outwards, giving it a realistic and full appearance, often finished with a vibrant center. This project is perfect for both complete beginners looking for a rewarding first fold and kids who love getting their hands creative. You can expect to complete your Carmen Sprung flower in about 15-30 minutes, making it an ideal quick craft or even a charming handmade gift. In this tutorial, I’ll guide you step-by-step through each fold, helping you achieve those lovely petal formations and understand the clever techniques that bring this origami flower to life. Let’s get folding and bring some paper beauty into your world!
Crafting the Carmen Sprung Origami Flower: A Step-by-Step Guide
Hello fellow paper enthusiasts! Today, I’m absolutely thrilled to guide you through the creation of a truly delightful origami model: the Carmen Sprung flower. This design, named after the talented origami artist Carmen Sprung, is a beautiful representation of a blooming flower, and it’s more accessible than you might think. I’ve found it to be a wonderful project for both developing your precision and adding a touch of handmade charm to your surroundings. Let’s get started on this rewarding journey!
Choosing Your Paper: The Foundation of a Beautiful Bloom
The right paper is crucial for any origami model, and the Carmen Sprung flower is no exception. Think of it as the petals of our flower – they need to have the right texture and weight to hold their shape beautifully.
For this particular flower, I highly recommend using standard origami paper. This paper is specifically designed for folding, offering a good balance of strength and flexibility. It’s typically thin enough to allow for many layers of folds without becoming too bulky, yet strong enough to withstand creasing.
The weight of the paper is also a consideration. Look for paper in the 70-90 gsm (grams per square meter) range. This is a common weight for origami paper and provides a nice crispness to your folds. Anything much heavier might make it difficult to achieve sharp creases, especially in the later stages of the model.
Regarding size, I find that squares ranging from 15cm x 15cm (about 6 inches x 6 inches) to 20cm x 20cm (about 8 inches x 8 inches) work wonderfully. Smaller squares will result in a more delicate, miniature flower, while larger squares will yield a more substantial bloom. A 15cm square is an excellent starting point for beginners as it offers enough space to work with without being overwhelming.
Now, let’s talk about the paper’s appearance. The Carmen Sprung flower looks fantastic with both single-sided and double-sided origami paper. If you use single-sided paper, the coloured side will typically become the outside of your petals, while the white side will be hidden within the folds. This can create a lovely contrast and depth. If you opt for double-sided paper, where both sides are coloured, you’ll have a vibrant flower where all visible surfaces are beautifully toned. For this tutorial, I’ll assume you are using single-sided paper with the coloured side facing up initially, but feel free to experiment with double-sided paper!
Mastering the Base Folds: Building Blocks of Brilliance
Before we dive into the specific steps for our Carmen Sprung flower, it’s important to get comfortable with a couple of fundamental origami folds. Practicing these will make the entire process smoother and ensure your finished flower is as elegant as possible.
The Valley Fold
This is probably the most common fold in origami. Imagine you are folding a piece of paper in half. A valley fold is when you fold the paper towards you, creating a crease that looks like a valley. For this flower, you’ll be making many valley folds to bring corners to edges or to other corners. The key to a clean valley fold is to align the edges or corners precisely before making your crease. Run your fingernail firmly along the fold line to ensure it’s sharp and well-defined.
The Mountain Fold
A mountain fold is the opposite of a valley fold. You fold the paper away from you, creating a crease that resembles the peak of a mountain. You’ll often perform a mountain fold after you’ve already made a valley fold. The trick here is to unfold the paper slightly and then push the crease inwards so it stands up like a mountain. Again, sharp creases are your best friend!
The Inside Reverse Fold
This fold can be a little trickier for beginners, but it’s essential for shaping petals. Imagine you have a flap of paper that you want to tuck inside itself. You essentially open up the layers of paper and fold the flap inwards along a pre-existing crease, then close the layers back up. The key to a successful inside reverse fold is to have a clear crease to guide you and to carefully manipulate the paper layers. Don’t be afraid to gently unfold and refold if it doesn’t look quite right the first time. Patience is key!
The Fold Sequence: Bringing Your Carmen Sprung Flower to Life
Let’s get folding! Grab your square of origami paper, coloured side up if using single-sided paper.
1. Start with your coloured side facing up. Fold the square in half diagonally, bringing the bottom left corner up to meet the top right corner. Crease firmly. Unfold.
2. Now, fold the square in half diagonally the other way, bringing the bottom right corner up to meet the top left corner. Crease firmly. Unfold. You should now have two diagonal creases forming an ‘X’ on your paper.
3. Flip the paper over so the white side is facing up.
4. Fold the paper in half horizontally, bringing the bottom edge up to meet the top edge. Crease firmly. Unfold.
5. Fold the paper in half vertically, bringing the left edge over to meet the right edge. Crease firmly. Unfold. You should now have a grid of four creases.
6. Now, we’ll create a preliminary base. Gently push the left and right edges of the paper inwards, along the horizontal crease you just made. As you do this, the top and bottom edges will naturally come together. Flatten the model down into a smaller square. This is called a preliminary base or square base. The open edges should be at the bottom.
7. With the open edges of the square base pointing towards you, take the top layer’s right flap. Fold its bottom edge up to meet the center vertical crease. Crease firmly.
8. Repeat step 7 with the top layer’s left flap. Fold its bottom edge up to meet the center vertical crease. Crease firmly. You should now have a kite shape on the top layer.
9. Flip the entire model over.
10. Repeat steps 7 and 8 on this side. Take the top layer’s right flap and fold its bottom edge up to meet the center vertical crease. Crease firmly. Then, do the same with the top layer’s left flap.
11. You should now have a shape that looks like a diamond with two flaps on each side. Take the top flap on the right side and fold its pointed tip downwards, aligning it with the horizontal edge of the kite shape you’ve formed. Crease firmly.
12. Repeat step 11 for the top flap on the left side.
13. Flip the model over and repeat steps 11 and 12 on this side.
14. Now, we need to create the petals. Take the top right flap that you just folded down. You’re going to make an inside reverse fold. Gently open up the layers of paper. You’ll see a crease running down the center of this flap from the previous steps. Fold this flap inwards along that crease, tucking it inside the model. Close the layers of paper back up. This will form one of your flower petals.
15. Repeat step 14 for the top left flap.
16. Flip the model over and repeat steps 14 and 15 for the two flaps on this side. You should now have four distinct points or petals formed.
17. Gently pull on each of the four points (petals) outwards and downwards. As you pull, the center of the flower will open up. Continue to gently shape the petals until you achieve a pleasing flower form. You can curl the edges of the petals slightly with your finger for a more realistic look.
Common Pitfalls and How to Avoid Them
Even with clear instructions, beginners can sometimes encounter a few bumps along the road. Don’t worry, these are totally normal!
Sharp Creases are Your Friend (Seriously!)
One of the most common mistakes I see is a lack of crisp creases. This is especially important in the early stages when you’re forming the bases. If your creases aren’t sharp, your paper will be a bit floppy, making later folds inaccurate and the final model less defined.
* **How to Avoid:** Make sure to use the tip of your fingernail or a bone folder (if you have one) to really press down on every crease. Go over each fold at least twice. Think of it as giving your paper a strong, confident direction for each fold.
Misaligned Corners and Edges
In origami, precision is paramount. Even a slight misalignment in the initial folds can compound as you progress, leading to a wonky final product.
* **How to Avoid:** Take your time! Before making any crease, carefully align the corners and edges you are bringing together. Hold them in place with one hand while you make the crease with the other. It’s better to take an extra few seconds to align perfectly than to rush and have to correct later.
The Inside Reverse Fold Wobbles
As I mentioned, the inside reverse fold can be a bit fiddly for newcomers. It’s easy to end up with a lopsided or messy fold if you’re not careful.
* **How to Avoid:** Go back to step 14. Before you attempt the inside reverse fold, ensure you have a good, clear crease from the previous folds that will act as your guide. Gently open the paper layers just enough to see that crease. Then, carefully tuck the flap inwards, following that crease. It might help to practice this fold on a scrap piece of paper a few times before trying it on your flower. Remember, a little bit of gentle persuasion and careful observation will go a long way.
Varying Your Carmen Sprung Flower: Endless Possibilities!
The beauty of origami lies in its versatility. The Carmen Sprung flower is no exception, and you can easily adapt it to create a whole bouquet of unique blooms.
* **Size Matters:** As mentioned earlier, simply using different sized squares of paper will dramatically change the size of your flower. Try small 5cm squares for tiny decorative accents or larger 25cm squares for a striking centerpiece.
* **Paper Patterns and Textures:** Don’t limit yourself to solid colours! Origami paper comes in a dazzling array of patterns – floral, geometric, abstract, and more. Using patterned paper can add incredible depth and visual interest to your flowers. You can also experiment with different paper textures, like textured cardstock or even slightly thicker watercolour paper (though be mindful of the thickness for folding ease).
* **Colour Combinations:** If you’re using double-sided paper, play with the colour combinations. You could have one side a vibrant primary colour and the other a softer pastel for a more subtle effect. Or, for a truly dramatic look, use contrasting colours for your initial square.
Displaying and Gifting Your Handmade Blooms
Once you’ve created your beautiful Carmen Sprung flowers, the fun doesn’t stop there! They’re perfect for a variety of occasions and decorative purposes.
* **Bouquets and Arrangements:** Group several flowers together to create a stunning handmade bouquet. You can use thin wire or floral tape to create stems. These make wonderful, long-lasting gifts.
* **Table Decorations:** Scatter a few flowers on a dining table for a special occasion, or use them to adorn place settings. They add an instant touch of elegance.
* **Gift Embellishments:** Attach a single, perfectly folded flower to a gift box or card. It’s a thoughtful and personalized touch that shows you’ve put extra effort into your present.
* **Craft Projects:** Use them in scrapbooking, card making, or even to decorate picture frames or mirrors.
* **Seasonal Decor:** Imagine a collection of Carmen Sprung flowers in autumnal colours for a fall display, or in soft pastels for spring. They can be adapted to any theme or season.
I hope you’ve enjoyed this detailed walkthrough of the Carmen Sprung origami flower! Remember, practice makes perfect, and the most important thing is to enjoy the process. Don’t be discouraged if your first few attempts aren’t flawless. Each fold you make is a step towards mastery. Happy folding!
Conclusion
Congratulations on completing your beautiful Carmen Sprung origami flower! Don’t worry if your first attempt wasn’t absolutely perfect; every fold is a learning experience, and practice makes progress. We encourage you to try this charming origami flower again, refining your technique with each new creation. Once you’re proud of your blooms, why not share your stunning origami flower with a friend or family member? For your next paper adventure, consider trying a different color scheme for your Carmen Sprung origami flower or perhaps exploring a slightly more complex floral origami model. There are so many wonderful paper projects waiting to be discovered!